There are two common kinds of files in GIS: vector files are made up of polygons, points, and/or lines (outlines of countries, maps of roads or rivers, points to represent cities)
raster files are images made up of grids of rectangles/squares, where each can have a value (e.g., 0-255) associated with it. The night lights layer is a raster.
Vector files can be manipulated relatively easily, using the Geoprocessing Wizard on the Tools menu, to dissolve, merge, intersect, clip or union.
Parts of a vector file can also be selected: you can extract some features from a shapefile and save them as a new shapefile by following these steps:
- In ArcMap, right-click a vector layer and choose Properties
- choose the Definition Query tab and click Query Builder...
- double-click a field to add it to the expression, click an operator (viz: = ), and double-click a Unique Value to add it to the expression. Thus
"CNTRY_NAME" = 'Turkey' OR "CNTRY_NAME" = 'Greece'
will select BOTH Turkey and Greece. Click OK to see the result.
- right-click the layer and choose Data > Export Data... and in the 'Output shapefile or feature class', change the path to H:\public_html\gs\ and add a name for the shapefile. In this case, it might be
H:\public_html\gs\turkgreece.shp [note backslashes: \ ]
- agree to Add that new layer
- Now delete the layer you used to select the new layer: right-click and choose Remove
- you may want to add the original layer back again in its unedited form, to return all of its contents to the screen
TRY THIS with several contiguous countries from the cntry02 layer.
Sometimes it's useful to be able to work with a small part of a raster layer --to clip just the relevant parts. The basis for clipping a raster is a shapefile (a vector file) used like a cookie cutter to select a piece of the underlying raster image. You can clip a raster with either a new shapefile or an existing shapefile.
You will use the Spatial Analyst extension to perform this procedure.
On the Tools menu, check the Extensions... option to see that Spatial Analyst has a checkmark in the box. You may have to add Spatial Analyst via View > Toolbars and checking Spatial Analyst.
These steps allow you to clip a raster with a new shapefile:
First, create the shapefile that will provide the new extent of the raster:
- Start ArcCatalog.
- Navigate to the folder where you want to create the shapefile, right-click on the folder, and select New &
gt; Shapefile.
- Name your shapefile and specify: Feature Type = Polygon (Spatial Reference is optional)
- Start ArcMap.
- Add the newly-created shapefile layer and the raster layer (e.g., nitelitesgeog) to be clipped.
- Fom the Tools menu, choose Editor Toolbar
- From the Editor dropdown, click Editor > Start Editing and specify: Task = Create New Feature and Target = [choose name of shapefile]
- Select the Create New Feature tool (click on the pencil icon to select it).
- Draw a polygon around the area of the raster which you want to clip (click points around the perimeter of the clip, and double-click to complete the polygon).
- Stop editing and save your edits (be sure to save to H:\public_html\gs\).
TRY THIS with an area of the nightlites raster
Now execute the clip:
- From the Spatial Analyst dropdown menu, select Options from the General tab, set Working directory to H:\public_html\gs, and specify Analysis Mask = [choose name of the shapefile].
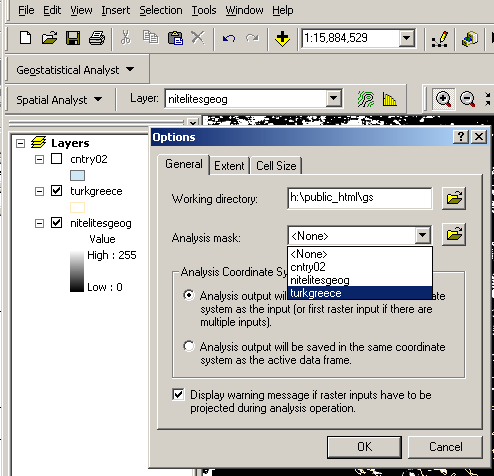
- Click on the Extent tab and specify Analysis Extent = [choose name of the shapefile] and click OK.
- From the Spatial Analyst dropdown menu select Raster Calculator.
- Double-click your raster listed under Layers so it appears in the expression box.
- Click on the Evaluate button and wait while the process executes.
A new raster will appear in the table of contents with the same extent as the shapefile. You may need to turn off the other layers to see the new raster.
You can also do this procedure with an existing shapefile. Instead of going through the above steps to create a new shapefile, simply use the existing shapefile in the "Now execute the clip" steps.
(based on instructions from http://www.esricanada.com/english/support/faqs/arcgis/sa2.asp)